
Table of Contents
ToggleRemoving window tint can seem daunting, but it doesn’t have to be. Whether it’s bubbling, peeling, or simply outdated, knowing how to safely and effectively remove window tint can restore clarity and enhance the appearance of any vehicle or home. With the right tools and techniques, anyone can tackle this task with confidence.
In this guide, readers will discover step-by-step methods to remove window tint without damaging the glass underneath. From using heat to applying adhesive removers, each approach is designed to make the process as smooth as possible. By following these tips, individuals can achieve a professional finish and enjoy a fresh start with their windows.
Understanding Window Tint
Window tint refers to a thin film applied to glass surfaces, altering their appearance and functionality. Familiarity with the types and benefits of window tint aids in understanding why removal may be necessary.
Types of Window Tint
- Dyed Window Tint
Dyed window tint consists of a layer of dye applied between an adhesive layer and a protective coating. It provides a non-reflective appearance and blocks UV rays but may fade over time.
- Metalized Window Tint
Metalized window tint contains tiny metallic particles that reflect heat and block UV rays. Its durability offers scratch resistance, but it can interfere with electronic signals.
- Ceramic Window Tint
Ceramic window tint incorporates ceramic particles, providing excellent heat rejection without signal interference. It’s durable and doesn’t fade but comes at a higher cost.
- Carbon Window Tint
Carbon window tint contains carbon particles, blocking a significant amount of infrared light without reflective surfaces. It offers longevity and an attractive matte finish.
Benefits of Window Tint
- Heat Reduction
Window tint helps reduce the internal temperature of vehicles or rooms, improving comfort during hot months.
- UV Ray Protection
Window tint filters out up to 99% of harmful UV rays, protecting skin and reducing the risk of skin cancer.
- Glare Reduction
Window tint minimizes glare caused by sunlight, enhancing visibility for drivers and reducing eye strain.
- Privacy Enhancement
Window tint increases privacy by limiting visibility into vehicles or rooms, providing security for occupants and valuables.
- Energy Efficiency
Window tint contributes to energy savings by reducing reliance on air conditioning and heating systems, resulting in lower utility bills.
Reasons for Removing Window Tint
Removing window tint can enhance both aesthetics and functionality. Common reasons include fading, damage, and adherence to legal standards.
Fading and Damage
Fading occurs when window tint loses its color and effectiveness, exposing the interior to harmful UV rays. Damage, such as bubbling or peeling, not only detracts from the vehicle’s appearance but can also compromise visibility. These issues stem from prolonged exposure to sunlight or poor installation practices. Regular inspection helps identify these problems early, facilitating timely removal before further damage occurs.
Legal Regulations
Legal regulations play a crucial role in window tinting practices. States enforce specific guidelines regarding tint darkness and reflectivity. Non-compliance can lead to penalties, including fines or required removal. It’s important for vehicle owners to familiarize themselves with local laws to avoid potential legal issues related to window tint. Regular reviews ensure adherence to these regulations, promoting safety and legal compliance.
Tools and Materials Needed
Removing window tint requires specific tools and materials to ensure a smooth process. Gathering everything beforehand simplifies the task and enhances safety.
Safety Equipment
- Safety goggles: Protect eyes from debris and potential chemicals during the removal process.
- Gloves: Use disposable gloves to prevent skin contact with adhesive remover and other harsh substances.
- Dust mask: Consider wearing a dust mask, especially when working with materials that produce fumes or dust.
Cleaning Supplies
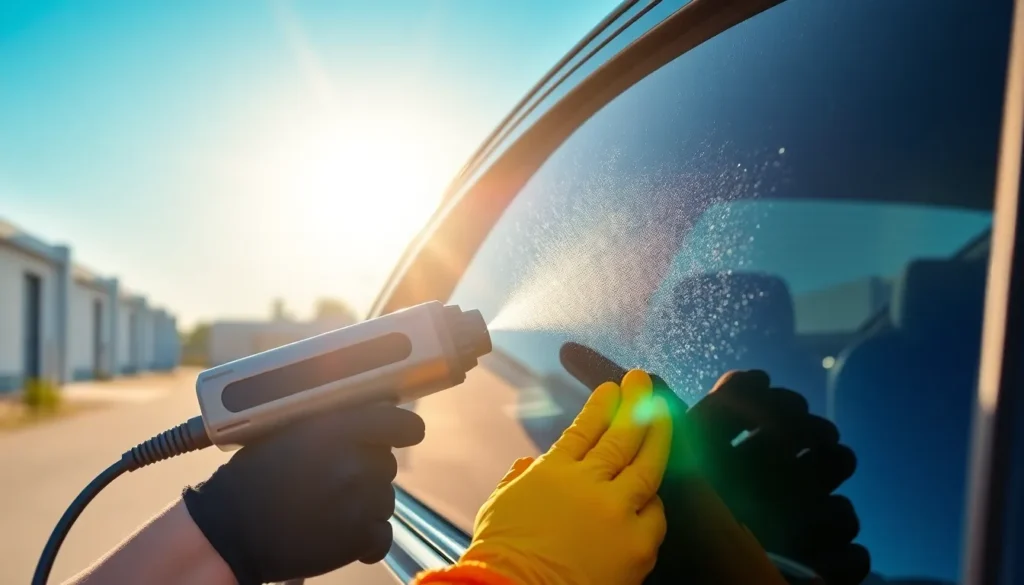
- Heat gun: A heat gun softens the adhesive, making it easier to peel off the tint without damaging the glass.
- Glass cleaner: Use a high-quality glass cleaner to remove residue and ensure a clear finish once the tint is removed.
- Paper towels or microfiber cloths: These absorbent materials help clean surfaces and remove any leftover adhesive remnants.
- Adhesive remover: Select a commercial adhesive remover specifically designed for automotive tint to ensure efficient solvent-based cleaning.
Methods for Removing Window Tint
Various methods exist for removing window tint effectively. Each method utilizes different techniques, ensuring a safe and thorough removal process.
Heat Method
The heat method employs a heat gun or hairdryer to loosen the adhesive on window tint.
- Heat the corner of the window tint with the heat source for about 30 seconds.
- Use a razor blade to lift the corner carefully, avoiding glass damage.
- Gradually peel the tint away while continuing to apply heat to the film and adhesive.
- Remove any remaining adhesive with a commercial adhesive remover and clean the glass afterward.
Steam Method
The steam method uses steam to soften adhesive effectively, allowing for easier removal.
- Fill a steamer with water and allow it to heat up to produce steam.
- Hold the steamer close to the window tint, focusing on one section at a time.
- As the steam penetrates, peel back the tinted film using a plastic scraper or razor blade.
- Continue until all tint is removed, then clean the glass surface to remove residual adhesive.
Solvent Method
The solvent method utilizes adhesive removers to dissolve the window tint adhesive.
- Apply an adhesive remover specifically designed for automotive use directly to the tint.
- Allow it to sit for the recommended time according to the product instructions.
- Use a scraper or razor blade to lift the film away gently.
- Clean the window thoroughly with glass cleaner to eliminate any remaining residue after tint removal.
Tips for Successful Tint Removal
Successful window tint removal relies on careful techniques. Following some best practices enhances the process and ensures optimal results.
Test a Small Area First
Testing a small area is essential to determine how well the tint separates from the glass. He or she should choose an inconspicuous spot to apply adhesive remover or heat. Checking for responsiveness ensures that the glass remains undamaged and provides insight into the overall removal process. If the tint lifts easily, proceeding with confidence becomes easier.
Working in Sections
Working in sections simplifies the removal process and prevents overwhelming challenges. He or she can focus on one corner or strip of the window at a time. Removing smaller segments allows for better control and precision, enhancing the likelihood of complete adhesive removal. Gradually working through the entire window ensures that no leftover adhesive compromises the final appearance. Using consistent techniques within each section maintains effectiveness during the process.